Showing posts with label Pumpkin. Show all posts

Thursday, November 22, 2012

Thanksgiving... Piece of Cake!


The holidays make me do crazy things. Shopping at midnight to save $30 is one of those things. Yeah, that's not as hardcore as I used to be... Breaking night on the same night every year, standing in line for 7 or 8 hours in the bitter cold... Florida is always hot, their winters are fairly mild for the most part. But that one night that I spend outside is always in the 40's. 

But I digress. 

I'm not here to talk about shopping and the way retailers are missing the whole concept of Black Friday by opening doors for sales at 8 p.m. Thanksgiving night. 

Even though I could totally talk about that for hours.

Shopping... That is. 

No, I'm here to talk about Thanksgiving! Which coincidentally, is (checks calendar) TODAY

Holy crap I am slacking! You should have had this recipe days ago! Oh well, it's here now. I hope you have the ingredients or a Wally World nearby because this is the dessert to have after a Thanksgiving feast.

Matter of fact, I take that back and replace it with a public statement not condoning the action of going to Walmart on Thanksgiving Day. Odds are if you don't trip over sad Black Friday shoppers camping out, you'll probably get swung at by a mother as you reach for the last bag of pecans. 


Praline Pumpkin Cake: (adapted from here)


                          1/2 cup ~ Butter
                          1/3 cup ~ Heavy/Whipping Cream
                             1 cup ~ Brown Sugar
                       1 1/2 cup ~ Pecans, roughly chopped
                             1 box ~ Moist Yellow Cake Mix
                       1 1/4 cup ~ Pumpkin Puree
                          1/2 cup ~ Milk
                          1/3 cup ~ Vegetable Oil
                           4 each ~ Eggs
              1 1/4 teaspoon ~ Pumpkin Pie Spice
                 1/4 teaspoon ~ Cinnamon
                 1/4 teaspoon ~ Nutmeg, freshly grated
                    1 container ~ Cream Cheese Frosting
                 3/4 teaspoon ~ Pumpkin Pie Spice
                 1/4 teaspoon ~ Cinnamon
                                          Caramel Topping to drizzle 


Notes:

  • Confucius say: You gonna need some cake pans if you gonna wanna make some cake.


Now, I know what you're thinking. You don't even have to say it even though you probably already did. I mean, it's not a secret, it's right there in black and white: a box of cake mix. 

No, you're right. I always try to stay away from ready made or easy boxed stuff and try to show you how you can harness your inner chef. But let's be real. It's freaking Thanksgiving. You got a ton of other stuff to do and if you'll be able to make something like this cake out of a box, I think we can all turn our heads as we open said box and pour its mysterious contents inside of our mixers. 

Besides, I really don't care if you judge me about this. Have you seen that cake?! That Betty Crocker broad knows what the heck she's doing:


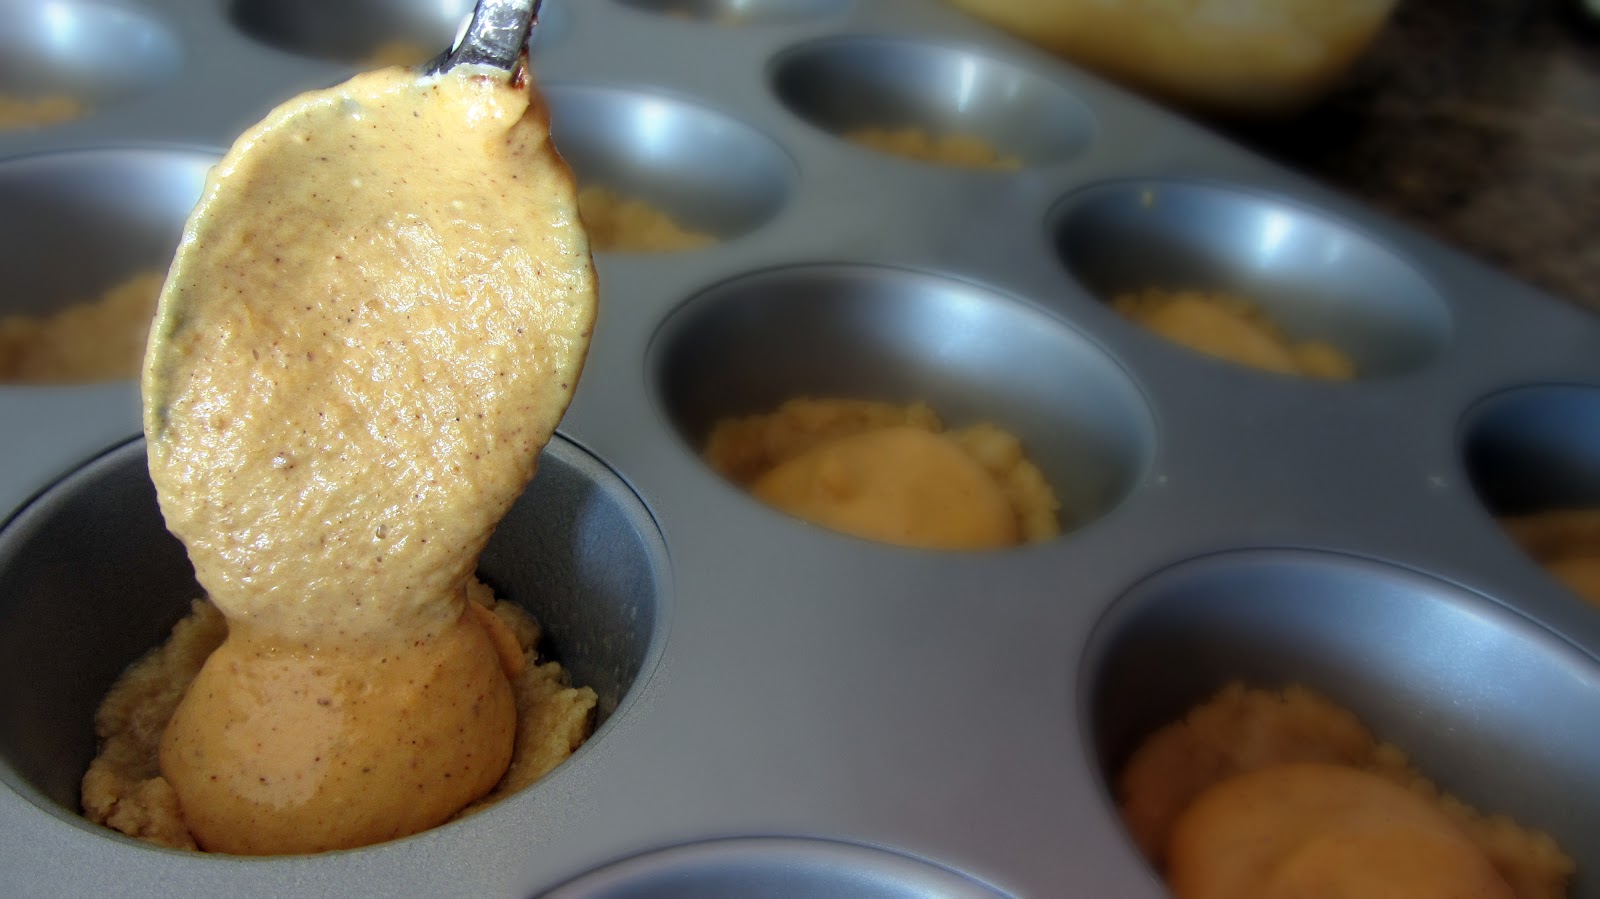
  • Firstly as most of the time sometimes, turn on your oven to 325. Then spray two 8 or 9 inch round cake pans with cooking spray. Next, in sauce pot put in the butter, heavy cream,  extract and brown sugar. Set it on low heat and stir until the butter melts. But don't just sit there watching the butter melt. I know how cool it looks but you got stuff to do. 


  • Go and give your pecans a rough chop, setting aside about 1/4 cup for the top of the cake. 


  • When you're done with that and the butter is melted and everything is incorporated, split the mixture evenly between the two cake pans and sprinkle the pecans over it. You want to get a nice even layer so make sure you split your pecans evenly.


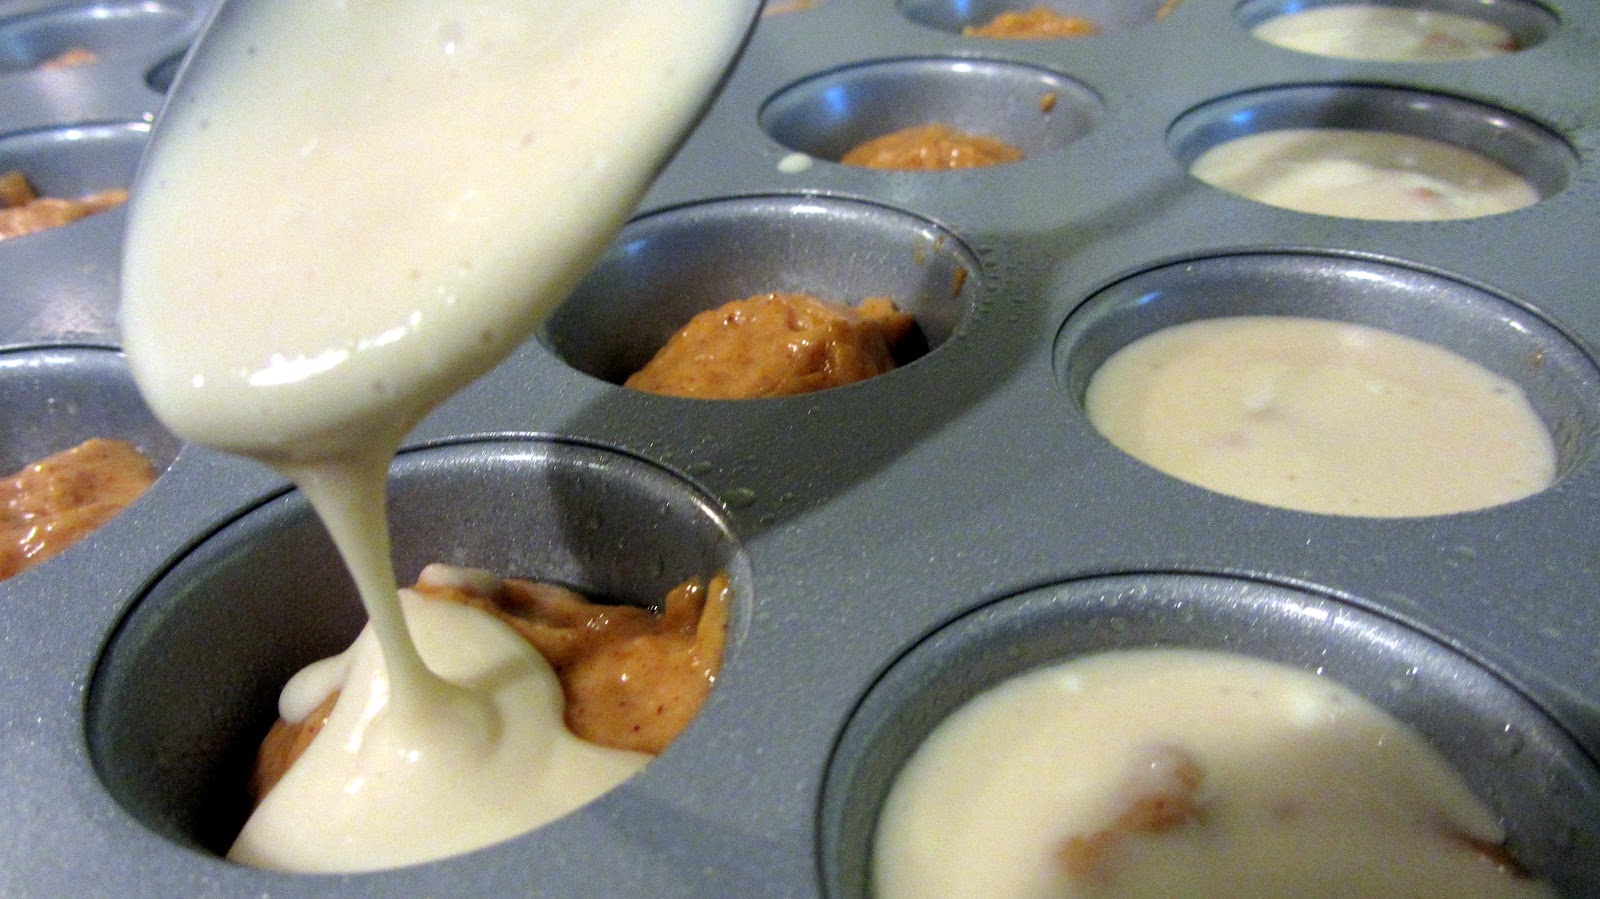
  • Next, dust off your mixer. Add everything in the bowl: pumpkin, milk, oil, eggs, spices and the (shudders) cake mix. Set it on low-medium-ish and let it do what a mixer does for about 2 minutes. 


  • Once the batter is ready, caaaaarefully spoon it or just let it glide into the cake pans. You want to make sure you go nice and slow because you don't want it disturbing the brown sugar and pecan mixture. Divide the batter evenly among the two pans, and then pop them into the oven for about 43 minutes. When you lightly touch the center and it springs back (instead of breaking through and coating your finger in magma-like cake batter), then it's done. 


  • Set the pans to cool on a cooling rack for about 4 or 5 minutes. After that, it's safe to carefully pull the cake away from the edges of the pan and then flip it over to your hands where you can transfer it back to the cooling rack. Was that confusing? Tough cookies, read it again slowly.


While the cake is cooling for the hour that it should cool, take the... Oh, I forgot to tell you. I don't know if you noticed, but we're also using store bought cream cheese frosting. 

Look, whoever you're baking this for isn't going to give two pumpkin seeds about how you made it or if it was from scratch. So I'd appreciate it if you eased up off my back about it. 


  • Anyway, take your container of cream cheese frosting and add the cinnamon and pumpkin pie spice directly to it. Stir it until it's incorporated


  • Once the cakes are cooled, put one pecan side up onto wherever you're going to want to keep it. Take half the cream cheese mixture and plop it onto the cooled cake and spread it around. Once you did that, take the other cake and place it on top pecan side up. Plop the other half of the cream cheese onto that one and spread it out evenly..


  • Drizzle some caramel sauce on top and sprinkle the 1/4 of a cup of pecans you set aside earlier, then stand back and remember to wipe your drool.


So there it is. What could possibly be my favorite cake ever. Everything about it is spectacular and I don't think there is a better way to welcome the holiday season.

Speaking of holiday's... Have a Happy Thanksgiving!!

Saturday, November 10, 2012

Pumpkin Spiced Mini Doughnut Muffin Hole Thingies


So it would seem as if every food blog you go to has these little balls of goodness. Even saw them on TV the other day being sold in a bakery somewhere. The popularity of them is both attracting and discouraging. I don't really want to be like other blogs out there, but at the same time, man these things are addicting. So easy to make and easy to eat. I swear you'll have like 2 or 3 balls in your mouth before you finish swallowing the first.

...Sorry, I'm laughing so hard at myself right now...

Anyway, what are these things? Muffins? Doughnut holes? Well, I think it depends. I did them a few ways and one way, I'd definitely call them doughnut holes, but in the other they're closer to muffins. But for arguments sake, I'll just refer to them as doughnut holes from now on.

No... Muffins.

Okay, doughnut holes..

Ugh, whatever.


Pumpkin Spiced Mini Doughnut Muffin Holes: (adapted from everywhere on the freaking blogosphere)

Batter:

                    1 3/4 cup ~ Flour
               2 teaspoons ~ Baking Powder
              1/2 teaspoon ~ Salt
           1 1/4 teaspoon ~ Pumpkin Pie Spice
              3/4 teaspoon ~ Cinnamon
              1/2 teaspoon ~ Nutmeg, Freshly Grated
                       1/3 cup ~ Canola Oil
                       1/2 cup ~ Brown Sugar
                        1 each ~ Egg
         1 1/2 teaspoons ~ Vanilla Extract
                          1 cup ~ Pumpkin Puree, canned
                       1/2 cup ~ Milk


For Doughnut Holes:

                       1/4 cup ~ Butter, unsalted, melted
               1/3 - 1/2 cup ~ Sugar
         1 1/2 teaspoons ~ Cinnamon
              3/4 teaspoon ~ Pumpkin Pie Spice
              1/8 teaspoon ~ Nutmeg, Freshly Grated

For Mini Muffins:

                    4 ounces ~ Cream Cheese, room temperature
                              1/2 ~ egg, beaten
                          1 cup ~ Powdered Sugar
                 1 teaspoon ~ Vanilla Extract


Notes:

  • As you can see, I split the recipe. So basically, these are two different products. You don't have to make both, it's perfectly okay to make one and not the other without hurting my feelings too much. The sugared version is what tastes like doughnut holes and the cream cheese mixture makes it more of a muffin.
  • Yes, muffin. You'll be using your muffin pans again. 
  • The doughnut holes are freaking great, but thanks to the way the sugar is applied, they won't keep well for more than a day or two. They'll be fine for eating, but they'll just be soggy and not as visually appealing, so it might be best if you make them the day of if they're for a get together or something. You can make the muffins ahead of time and then apply the sugar when you're going to have them.
  • If you're just making this for yourself then who cares what they look like or how soggy they are?! You're still going to stuff your face with them, and don't act like you're not. I know what you do when no one is watching. 
  • I know half an egg sounds dumb, but you don't need the whole thing.
  • The cream cheese on the muffins is more tangy than sweet. It's not there to overpower the muffin, it's more of a compliment and another layer of flavor. Just so you know.


Let's get some holes up in here:


  • Turn on your oven to 325 and spray your mini muffin pan with some cooking spray. 

  • For the batter, take the flour, baking powder, salt, and spices and mix them together in one bowl. Take another bowl and add the oil, brown sugar, egg, extract, pumpkin puree and milk, and whisk that till it's smooth. Once it's smooth, add the dry mix to the wet mix and whisk till it's combined and happy.


That's it, the batter is done. If you're only making the doughnut holes and you're not making the muffins, skip the next step. 

  • For the muffins, take the room temperature cream cheese and.... seriously? You didn't leave out the cream cheese again? I'm literally facepalming right now. I guess I can't be too hard on you, as you can tell by my pic below, my cream cheese is a little runny and it's probably because it's been nuked. Take the room temperature or more than likely microwave softened cream cheese and add the egg, powdered sugar and vanilla, and mix till combined.Set aside.

Ok, break's over, you can stop skipping steps now.

  • For the main event, take the batter and spoon it into the muffin pan. I went up about 3/4 of the way and was alright. If you're making muffins: top off batter with the cream cheese mixture. You don't need a lot, just enough to cover the batter. Once done, put it in the oven for about 13-15 minutes, until a toothpick comes out clean. When they're done, pop them out and set them to cool on a cooling rack.


At this point, the cream cheese topped muffins are done. So enjoy those. If you're feeling really crazy, you can convert them into doughnut holes, but I personally like the tangy cheesy aspect to the spice in the muffin with no sweetness involved.

But if you're not into tangy cheesy stuff and need something sweet, let's get the doughnut hole party ready:

  • Get two small bowls. In one bowl, add the butter and melt it completely. In the other bowl, add the sugar and spices and mix till well combined

Now, I hope you're ready to get Paula Deen crazy...

  • Once the muffins are cooled, take a few and dunk them in the melted butter. Oooooooooooh yeah, ya'll. When they're nice and coated with butter, roll them around in the sugar. When they're nice and coated in the sugar, try not to freaking eat them all.


And there you go. You've just made quite the addicting dessert, perfect for a brisk fall day. And in case you're wondering, these go absolutely perfect with your pumpkin spiced latte. 


Mmmm... Pumpkin spiced latte....

Monday, October 29, 2012

Johnny Pumpkin Seed


I know I said I was going to do a few sweet posts in a row. But you can't blame me for going back on that for this one post. More than likely, there's only a few days left before you'll come across the opportunity to make these. Not to mention the fact that they're downright addicting. 

And to be honest, I did try to make a sweet version, but I failed. And I failed bad. 

Don't look at me like that! I've never done this before! In my adult life, this is the first time I've ever carved a pumpkin (with my wife's help), let alone roasted pumpkin seeds.

Which, by the way, I think the carving went fairly well...


But I'm not here to talk pumpkin, I'm here to talk seeds. Addicting, little seeds. 

When I was getting advice, thinking, and researching on how to roast the seeds, I was getting crazy excited, finding a few recipes that sounded amazing. Like one with Balsamic Vinegar, Olive Oil and salt, or another with garlic and parmesan. Pumpkin seeds seem to be rather flexible. So I split up my batch and made one regular with salt and oil, and the other with butter, cinnamon, pumpkin pie spice, ginger, and brown sugar. Sadly, the sugar and spice one did not come out the way I was hoping. And by sadly, I mean if my kid wasn't there, I probably would have cried. But if I get my hands on some more seeds I'll give it another try.

I'll have to fight myself to not make the salt and oil ones again though. Because... Boy, oh boy...


Roasted Pumpkin Seeds:


                                     2 cups ~ Pumpkin Seeds
                        2 tablespoons ~ Extra Virgin Olive Oil
         a good 1 1/2 teaspoons ~ Kosher or Sea Salt


Notes:

  • Like I said, there are a bunch of different, tasty sounding recipes. But this seems like the go-to, can't beat method. So simple, so easy and so good. A few grinds of freshly cracked pepper would probably be welcomed, but other than that, it's pretty perfect.

Let's get to roastin'!:

  • First and foremost, you need to get the seeds out of the pumpkin. When you're scooping it out, put all of the innards in a big bowl.


  • Turn on the oven to 300. 

Now, I'm pretty sure I went about this the wrong way, because I spent a good 4 hours (the clock said 15 minutes, but I think it was on the fritz) trying to pick out all the seeds from the orange goop. I wanted to keep the stringy mess to puree it and make a pumpkin pie. But honestly, I don't have time for all that. Especially when I have 3 cans of the stuff in the pantry. But once I had freed all the seeds from their membrane prison, I filled up the bowl with water and watched all the seeds float to the top. So I guess I could have just done that from the beginning and saved me about 3 and a half freaking hours. 


  • So if you want to, go through and get all the big clumps of pumpkiny entrails out first. Then fill up the bowl with water and use a slotted spoon, spider, or just your hands to skim out the seeds into a strainer. If you're using the water method from the beginning, once the initial floaters are scooped, just rustle the sunken remains around until you loosen up the rest of the seeds. 


  • You'll notice the seeds are fairly slimy. You're not going to get much of anything to hold on to them like that, so what I did was lightly pat them dry with a paper towel (they're going to get stuck to the paper towel, so I hope the paper towel you're using isn't thin. If it is, then skip the paper towel), then put them on a parchment lined sheet tray and put them in the oven for 10 minutes. That dried them out perfectly for me without roasting them. Once they're done drying, turn the oven up to 350.


  • So once they're dried out, put them in a bowl and add the olive oil and salt then toss till they're coated. Once coated, arrange them in a single layer on a parchment lined sheet tray (I used the same one I dried them on). Put them in the 350 oven for about 20 - 30 minutes, making sure to take them out and shuffle them around every 10 minutes

Heck, if you want to experiment, go for the spiced version: 

Take 1 teaspoon of pumpkin pie spice, 1/2 teaspoon cinnamon, 1/4 teaspoon of ginger and 1/4 teaspoon of fresh grated nutmeg, and mix it in the dried pumpkin seeds with 1 tablespoon of melted butter. I'm pretty sure where I went wrong was the brown sugar, so just leave that out and you should be fine. Let me know if it works.

Once they get a little golden, I took them out. If you want them a little darker and crispier, by all means keep them in a few minutes longer. But this works for me. 


I know it's going to be hard, but you have to wait till they cool down before you pop one in your mouth. I mean, you don't have to, but don't blame me when your mouth is blistered. 

Friday, October 26, 2012

One Cookie To Rule The Fall


I cannot begin to describe the shame I feel I have brought myself. My disappointment Is the size of Great Pumpkin, Charlie Brown! Why? You know why. Don't sit there and act like you haven't been shaking your head at me for weeks. Look at me, here, with this food blog, and I have not posted one thing... not one thing about fall yet. It's practically November and here I am talking to you about garlic bread and spaghetti!!

No, there is no excuse. 

Ok, maybe. I've kinda been moving into a house. And if you know what moving entails then you're already nodding your head in agreement.

But other than that, NO EXCUSE! 

When my son goes to school in a few years the kids will tease him and call him names because of my shameful act. I feel terrible, I really do. Tell me, what can I do to make it up to you?

Would a couple of posts in a row of nothing but enticing, fall inspired sweets put me back on your good side? Will all this be put behind us, forgiven and forgotten, like nothing ever happened, and then we can move on? 

Maybe? Ok, that's a start. Here, maybe this will help...


Pumpkin Pie Cookies


Ah... Look at your eyes open up. A little smile creeping on. Yeah, go ahead, shake it off, it's ok. I'll pretend like I didn't see it. I'll just go on...

Albert Restaino, friend of mine from twitter dubbed this The Year of the Pumpkin. And he's right, it does feel like it's everywhere this year more than others. The flavor, the scent, the spice.. He's right, and I'm surprised there's not a clothing line of some sort. But it's as if everybody everywhere is head over heels in love with everything pumpkin. I know Tyler Durden is somewhere shaking his head about it, calling it a fad, and I usually agree with him. But I just can't this time. Fall can give you all sorts of warm fuzzy feelings, and for good reason. If you recall, since moving to North Carolina, I have found myself a total fanboy of the seasons. Fall was one of my favorites to begin with. Tied, if not, slightly ahead of winter. But being here, seeing the trees change colors, the crisp air come in, I swear I sequel like a little girl every day.

But there's no fad when it comes to Pumpkin Pie. No line of hipsters waiting for a slice of it outside a coffee shop on a brisk October morning. Nope, Pumpkin Pie has been around for a long time. Recipes have been handed down for generations, your grandparents can remember eating it as kids, you get the idea. It's a fall staple and an OG in the pumpkin game.

So when I was trying to figure out what my first fall post should be about, Pumpkin Pie stood out to me. It's the epitome of fall. But at the same time I wanted to do something small, something easily consumed for get togethers. So when I was introduced to this recipe by Annemarie Zaitz on Google+, it was perfect timing. It's called a cookie, but it can also pass as a mini pie. I'm sorry if at any point in this post your mind explodes.

Ha, no I'm not:


Pumpkin Pie Cookies: (adapted from Here)


Cookie base/topping:
                    
                    1 1/4 cup ~ Flour
              1/2 teaspoon ~ Baking Soda
              1/4 teaspoon ~ Baking Powder
                          1 cup ~ Brown Sugar
                       1/4 cup ~ Sugar
              1/2 teaspoon ~ Pumpkin Pie Spice
                       1/4 cup ~ Cold Butter
                     4 ounces ~ Cold Cream Cheese

Pumpkin Filling:

                    4 ounces ~ Cream Cheese, softened
                 1 teaspoon ~ Vanilla Extract
              1 tablespoon ~ Sugar
             2 tablespoons ~ Brown Sugar
             2 tablespoons ~ Flour
             8 tablespoons ~ Canned Pumpkin
               1/2 teaspoon ~ Pumpkin Pie Spice
               1/4 teaspoon ~ Cinnamon
               1/8 teaspoon ~ Whole Nutmeg, freshly grated


Notes:

  • I know what you're thinking. It sounds like a lot, but it's not. 
  • You're gonna need muffin pans so I hope you got em. I used regular and mini. From this recipe I was able to get a full pan of regular sized cookies and a full pan of mini cookies. 
  • DO NOT overmix the cookie base. Don't use your hands to mix it together because that's an easy way to overmix. Instead, use a fork and just smash, cut, and mix the butter/cream cheese with the dry ingredients. Take your time and you'll get a nice crumbly mixture.
  • Speaking of the crumbly mixture, if it starts to clump together and look like a dough, just forget it because that's the beginning of the end of the world.
  • Seriously, if it is more doughy than crumbly don't freak out. The crumbled look is for the topping, which can easily be replicated by just tearing up the dough into small bits and putting it on the top. It's not as easy as sprinkling crumbles, but it works.
  • If the dough is too sticky to press down into the pan, add a little more flour and mix. If it's fine but gets sticky halfway through then stop and wash your hands, nasty.


Alright, I hope you're ready for fall to sucker punch you in the freaking mouth:


  • Heat your oven to 350.

  • You're going to need two bowls. In the first bowl, add all the dry ingredients and mix them. You can use your toes to mix them, I don't care. I do care that you use a fork for the next part. Add the cold butter and cold cream cheese to the dry ingredients and use your fork to incorporate and "cut in" until you reach a crumbly state. Please don't overmix and destroy the world.


Why cold butter? I'm glad you asked!

The colder the butter and cream cheese, the better. When you're making a dough it'll usually call for cold butter to be cut in with a pastry blender or a fork. To be honest, in my 10 years of cooking, I have absolutely no idea what a pastry blender even looks like. But I've been using forks for like, ever. A couple of pulses in a food processor has been known to do the job too. You want something that will incorporate the cold butter with the dry ingredients in a way that won't cause the butter to be over mixed, and that won't melt the butter during the process. The cold temperature of the butter will keep it together and make it harder to be absorbed into the flour. This will not only give you more structure (like the crumble state we're looking for), but it will also assure the presence of at least a few chunks of butter in the dough. Whole clumps of butter in a dough, when baked, will provide pockets and give you a nice flaky crust. 

But that's more for pie-pie. We're making pie-cookies. We still need the crumble though, so I didn't drop that science for nothing.


  • Once you have a crumbly mixture, set it aside. In the second bowl add the softened cream cheese. If it's not softened, what's the matter with you? You knew you were making this and you knew it called for softened cream cheese. You should have left it out like an hour ago. smh. If it's not softened, which I have a feeling it's not, put it in the microwave for 10 seconds. You're looking for a whipped cream texture. Once it's ready, add everything else and mix


  • Take your regular sized muffin pan and spray it with nonstick cooking spray. Work one pan at a time that way you don't grease up more than what you need. Grab about a tablespoon of the cookie mixture and press it down into the bottom of the muffin cups.


Pretend like you're making really small pies, it's the same concept. You don't want too much or you really will have small pies instead of cookies. A tablespoon or a little less gave me a fairly good size cookie. 

  • About a tablespoon worked for the pie filling as well. Spoon in the pie filling and make sure to not go over the edges. Keep it in the center of the dough. 


  • Next take some of the crumbly mixture and sprinkle it on top. I don't cover the whole thing, just 4 or 5 tiny pieces spread out over it. If you're a cinnamon freak like me, put a pinch of it to top it off.


  • Put it in the oven for 16-18 minutes, until the cookie is golden brown on the top and edges. Let it cool in the pan for about 15 minutes then take a butter knife and slide it around the sides till they pop out


If you're going to make the cookies in the mini muffin pan: Do everything the same.. but smaller (mind=blown). Less pie filling and less dough for the base of the cookie, maybe about half a teaspoon. And bake it off for 10-12 minutes.


As you can see, a little addition you can do to these is add a few chocolate chips on top of the cookie before you add the pie filling. As it turns out, chocolate and pumpkin are not too shabby together.


And there it is! My first fall recipe! I hope it was worth the wait. I know other food bloggers are probably sick of fall by now. But you know what?


That's their own damn fault. No one told them to be crazy foodies with all that time on their hands.


Side Note: I don't know if you can tell, but I'm a little picture happy. You can thank all the natural light coming into the kitchen I have now. Sooooooooo much better than the dungeon I was cooking in before. Hopefully you'll see more pictures like this from now on.